
![]()
Home > Newsletters > GreenFriends Newsletters > > Q4 2022 Newsletter
| Home | Source Reduction | Friends of Green Friends | Newsletters |
| Gardening | Resources | What You Can Do | Embracing The Trees |
| Wrapping Up the Garden for the Winter |
|
"Everything in Nature moves in an endless circle: there is birth, death, and again, birth. The seasons move in a circle: spring, summer, autumn, winter, and spring again. The earth moves on its axis around the sun. A seed germinates and becomes a tree; the tree blossoms and new seeds are born." – Amma |
 |
|
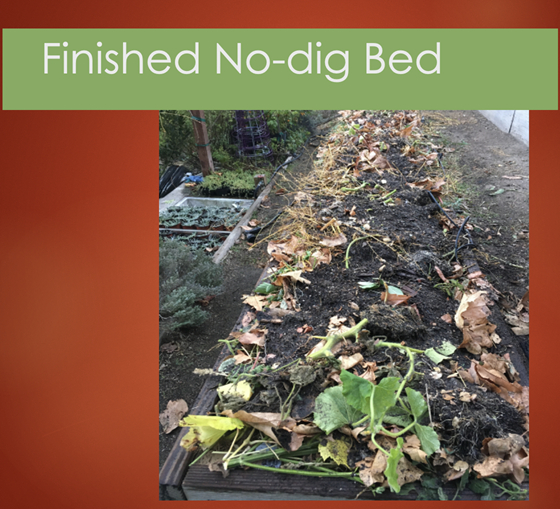
When I visit forests, I often see leaves drop to the ground. When I touch the ground, it is soft, moist, and dark, and smells richly like earth. When I dig under the leaves and into the soil, I see a few worms and other critters breaking down the leaves. And as I dig deeper, the soil is rich and spongy and holds together when I squeeze it. Laying there underfoot, this debris protects and nourishes the soil, the plants, and ultimately the entire food chain. In the forest, there is recycling of all plant matter and all apparent waste is re-incorporated back into the cycle of life. In nature, circular systems are self-sustaining and last thousands if not millions of years without degrading. By contributing to, rather than interfering with the natural cycles in nature, we not only come into harmony with nature, but we provide a lot of benefits for our garden to abundantly grow next year’s harvest. When wrapping up one’s garden for the winter, the no-dig bed technique mimics nature’s natural soil enrichment process. Not digging the soil emulates a stage in the life cycle of a forest where the leaves and other plant debris are left on the ground undisturbed. When building no-dig beds, organic material is added right on top of the soil. Alternate layers of brown and green plant materials such as leaves, weeds, grass clippings, compost, soil, and manures are piled on top of each other to form a mound. Over the winter, the organic materials break down, becoming fertile spring soil. When my husband and I built our no-dig beds, we asked our neighbors if we could gather some of their dried sycamore tree leaves. Not only did they say yes but they also offered us aged chicken manure. |
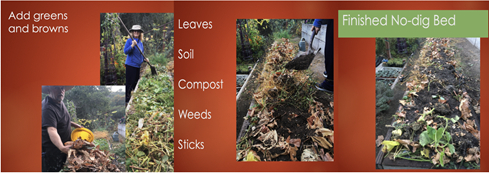 |
The following steps illustrate how to build a no-dig bed. The process is flexible and does not need to be followed exactly in this order, or with these materials.
2. Add some compost as your first layer to encourage the roots to go down. At our house we make compost from kitchen scraps, making note of which items break down the most efficiently. It is not uncommon to see an occasional eggshell, peach pit, or avocado pit in the compost layer. Sometimes we even see a few worms or other creatures. All these items will continue to decompose in the no-dig bed. 3. If you have a lot of weeds, place cardboard or newspaper over the first compost layer to prevent weeds from growing. Remove any tape from the cardboard, then wet it before you put it down. Whether you will be planting cover crops as mentioned in the next section or planting seedlings in the Spring, you will need to create small holes in the cardboard to let their roots reach the layer of compost on the bottom. You can use a digging fork to make the holes. 4. Place a few ‘drumstick’ width sticks as the next layer to create pockets of air in the bottom of your bed. It is important to have some air space in your bed or the materials may become anaerobic and not decompose well. If sticks and woody materials do not break down before springtime, it is okay to leave them in the soil until they do. 5. Add greens, browns, compost, or soil in layers. Always finish your no-dig bed by covering it with brown mulch and watering it. When choosing materials for your no-dig bed, some strong-smelling plants such as pine needles, have concentrated oils which prevent other plants from growing. Let these kinds of materials sit outdoors for a while to off-gas before using them in your no-dig beds. Once the odor is gone, strong-smelling plants can be used. Fresh wood chips are also strong smelling and will prevent plants from growing, so it is best to use them on the pathways. In some climates, materials will break down more slowly. If you live in a dry area, you may need to water your no-dig beds over the winter to encourage the breakdown and formation of organic matter in the soil. In climates like Amritapuri, materials break down very quickly due to humidity and a myriad of creatures in the soil. In Chicago, with a colder climate, it may take 6 months to a year for materials to break down. Even if materials are not completely broken down by springtime, you can still plant cover crops, veggies, or other plants on top of the no-dig beds in the spring. The no-dig gardening technique is beneficial in the following ways: it saves you time, retains moisture and nourishes the microbes, reduces the number of weeds, and increases plants’ immunity to pests and diseases. If you don’t have time to build a no-dig bed, it is best to cover the earth with mulch rather than leave the soil bare. Mulch protects soil from drying out and becoming compacted. |
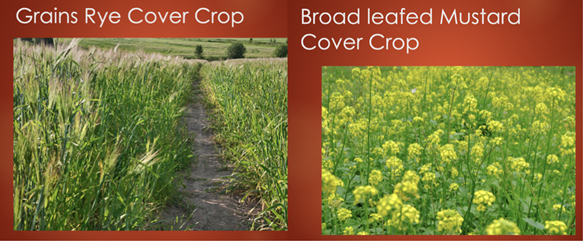 |
Cover CropsCover crops cover bare ground in your garden to prevent erosion and land degradation. In regenerative gardening, we aim to never leave any bare ground. Cover crops renew your soil over winter, protect and prepare the ground for future crops, breaking up compacted soil with their roots. They help keep beds clean and weed-free for spring planting, enriching the soil and keeping microbes alive by feeding them and boosting the soil’s organic content. The best time to sow cover crops is at the end of the summer growing season after the last crops are harvested from your garden. You can use any low-growing veggies to cover your soil such as arugula or lettuce, and it is also common to grow cover crops that don't create food to eat. Cover crops are grown from 3 basic plant families:
When choosing the best type of cover crop, legumes and grasses photosynthesize more quickly, providing more nutrients to your soil when cut and dropped later in the season. Grain cover crops are best for breaking up and aerating compacted soil. Red clover is a frost seedling and can be sown later in the season on frozen ground, surviving in the cold and sprouting when the weather warms. TopHarvesting a Cover CropIt is best to chop the cover crop down to the level of the soil, cut it up to and leave it on the soil as a layer (chop and drop) when it has flowered. Once the cover crop begins to form seeds, nutrients in the roots break down in the soil from the foliage and flowers, and roots are lost. Although the plant offers the soil the richest amendments when chopped and dropped before seeds are formed, letting cover crops produce edible veggies and beautiful flowers before chopping and dropping still benefits the soil-building process, although the nutrient return to the soil is diminished. My husband and I planted peas as a cover crop. The pea plants grew strong and tall up a trellis, with deep green leaves, and blooms too beautiful to harvest. They began producing delicious crunchy sweet peas. We couldn’t bring ourselves to chop and drop the plants until all the blooms were done and we had harvested the last of the peas. |
End of Season JournalOne way to review and reflect on your growing season is to keep a garden journal, noting what grew, what the weather and soil conditions were like, and which gardening practices worked and didn’t work. This can be a practical journal to help you plan for your coming season, or it can be a spiritual practice that also allows you to review your inner transformation and experiences. Some gardeners keep a journal season after season to help them track changes and develop better planting schedules, irrigation systems, soil care, and more. For organic gardeners who need to deal with growing challenges, critters, and climate change without chemical intervention, seasonal journaling can be particularly helpful. Mother Earth has generously provided us with greens, roots, veggies, and fruits. It is time now to give back to our mother and thank her. We can give back to her by restoring the minerals, microbes, and organic matter in the soil. By feeding and protecting the soil in the fall, we not only create an oasis for spring plants, but also an oasis for future generations. |
 |
| Mrs. Bari Anupama - Salinas, California |
Read about Informed Food Choices To Protect The Environment from the Q4 2022 newsletter >>
| Home | Source Reduction | Friends of Green Friends | Newsletters | Resources | What You Can Do | Contact Us |
For more information, e-mail info@greenfriendsna.org |
||||||